
Azure Functions is a “serverless” compute service that supports multiple programming languages. Some languages are officially supported, while others are in preview. ![]() I have numerous python scripts that I could push into the cloud to help me learn how to use Azure Functions. Unfortunately, the previewed languages do not have very much documentation out there. The biggest hurdle was importing python modules for use in an Azure Function.
I have numerous python scripts that I could push into the cloud to help me learn how to use Azure Functions. Unfortunately, the previewed languages do not have very much documentation out there. The biggest hurdle was importing python modules for use in an Azure Function.
Azure Functions uses the App Service on the back-end which allows you to customize your application environment with the help of Kudu. I found some documentation across multiple sites that had aged a bit. Not a single how-to post or guide had all of the answers. The inaccuracy of the guides I found may be from the preview nature of the language support. This is not surprising as Python is in preview. After lots of trial and error, I found a method that worked for me.
Create a Function App
First, create a new Function App.

Confirm the function app is up and running. Then click the + sign next to functions to add a function to the app.

The center pane will ask for a scenario and language to assist with a premade function. Since we are using python for our language, a custom function must be selected to proceed.

The next screen provides templates to use to get started. However, to use python, the “Experimental Language Support” switch needs to be enabled.

After selecting Python, only two options (HTTP trigger and Queue trigger) can be selected. For this demo, I will select HTTP trigger. I left the defaults for this example.

Update Python Version
Now that we have a function in the app, the python version needs to be updated. The python version that is installed is old and conflicted with my scripts. This may not be the case for your scripts but if you need to update to a specific version of python, this will assist in that process. My scripts were written for Python 2.7. I need to fix my scripts to support Python 3.6 but that will come at a later time. To get started, We need to access the Kudu tool. Click the Function App name on the left, then Platform features at the top, and then “Advanced tools (Kudu)” near the bottom of the center pane.

To update the Python version, click the Site extensions at the top.

Click the Gallery tab. Then type in Python in the search. The results will provide multiple versions of Python available to be installed. Pick your desired version.

I need Python version 2.7.14 x64. Click the + sign to install the extension into your environment. The install icon will show an animated loading icon while it is installing. Once it is finished, a X icon will be present in the upper right of the tile. Take not of the path where this version of python is installed. It will be needed later.
 Now that our desired version of Python has been installed, the Handler Mappings need to be updated. Go back to the Function App’s Platform Features page. Then select “Application settings.”

A new tab is shown in the center pane. Scroll to the bottom to the Handler Mappings section. A new mapping needs to be added. Click “Add new handler mapping” and enter the relevant settings for “fastCgi” handler mapping for the version of Python you installed. The path is shown on the tile when you installed the different version. My handler settings were as followed:
fastCgi ->D:\home\python27\python.exe -> D:\home\python27\wfastcgi.py

Scroll to the top of the Application Settings page and click Save.
You can test the version of Python being used by replacing the code in the run.py file with the following code:
import os
 import json
 import platform
 postreqdata = json.loads(open(os.environ['req']).read())
 response = open(os.environ['res'], 'w')
 response.write("Python version: {0}".format(platform.python_version()))
 response.close()
When the above code is run, the output returns the Python version. My example returns the correct version from the site extension I installed.

Create Virtual Environment
Next, a virtual environment needs to be created. This is where the Python modules will be installed. Head back to the Kudu tool and click the “Debug console” dropdown and click CMD.

At the top, you will see a directory structure that can be used for navigation. First, the virtual environment module needs to be installed as it does not seem to come with the updated version of Python that was installed previously with the site extension addition. Run the following command: “python -m pip install virtualenv”.

Now that the virtualenv module is installed, it is time to create a new virtual environment. Navigate to the following directory: “D:\home\site\wwwroot\{yourFunctionName}”. Then in the console type the following: “python -m virtualenv yourenv” where ‘yourenv’ will be the name of the virtual environment that you create.

Once the virtual environment has been created navigate to “yourenv\scripts” and run activate.bat. This will activate your virtual environment and place your active console in it. You can see if it is active as it the environment name precedes the path as shown below.
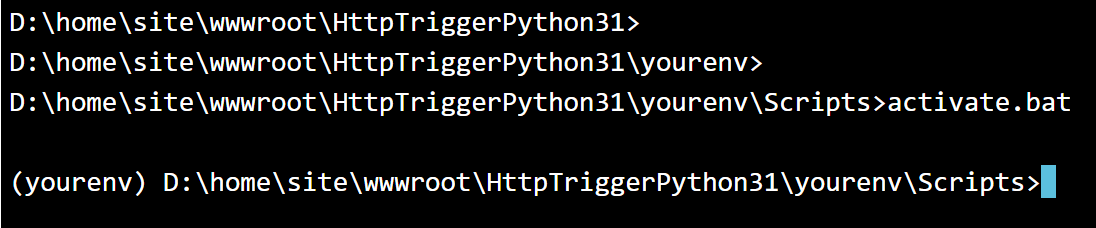
You now have access to run python commands that allow you to install modules and configure your Python environment to your needs.
Install Python Modules
Installing modules through PIP is recommended. However, I ran into an issue where PIP would not install a couple modules I needed. I recommend attempting to install using PIP first, as I did with ‘lxml’ below.

I have received an error while installing modules that indicates it needs the vcvarsall.bat file that is included within the Microsoft Visual C++ 9.0 package. If you do get this error, you can manually download the “wheels” that contain the module you need to install. The best site that I found that can direct you to the official wheel files is www.pythonwheels.com. From there, you can find the module you need. Select the correct version of wheel that is specific to your environment (2.7, 3.6, x86, x64, etc.). You also need to install the wheel module before you import these wheel files (python -m pip install wheel).
Now that wheel is installed and you have downloaded the correct .whl file for your module, you can simply drag and drop the .whl file from your desktop into the following folder: “D:\home\site\wwwroot\{yourFunctionName}\{yourenv}\Lib\site-packages.” It will unpack the .whl file automatically and make it available.
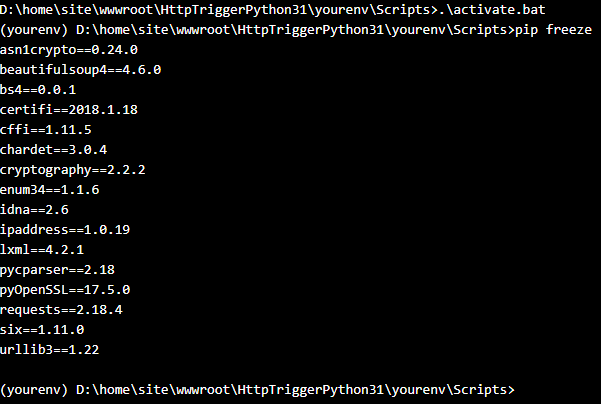
Once you have installed all of your modules, run “pip freeze” to discover the modules that are installed. I installed bs4, lxml, and requests. They naturally installed a few other modules as dependencies.
Import Modules Within Your Script
I know this has been long, but you’re almost done! The last thing to do is let Python know where your modules reside so it can correctly import them into your scripts for use. At the top of you script(s), enter the following code:
import sys, os.path
 sys.path.append(os.path.abspath(os.path.join(os.path.dirname( __file__ ), 'yourenv/Lib/site-packages')))
Ensure you replace “yourenv” with whatever you chose to name your virtual environment.
After that, your script will be able to import any Python module it needs and complete successfully.
Pingback: 1evacuate